Wednesday, April 21, 2010
Android Emulator Issue
Yesterday I resumed the work on improving the Packing List 1.5. However, the Emulator didn’t corporate. It kept crashing. I was so frustrated. I deleted and re-created the image several times. It still didn’t work. The error I received was something like "sad result from adb". What does “sad result” mean? They really should give it better description. Some times I received “the user data image is used by another emulator” while there was only one emulator and one user. I googled and no help. Finally, this morning I tried again, the emulator was so slow to start. So I checked the power mode on my laptop. It turned out I accidently set the power mode to “Power Saver” a couple of days ago. I changed it back. Now everything worked just fine!

Monday, February 8, 2010
Creating custom dialog in Android
This blog shows you an example on how to create custom dialog. For more information on creating different kind of dialogs, please visit http://developer.android.com/guide/topics/ui/dialogs.html
1. Create layout for the dialog
4. Call showDialog to display the dialog
1. Create layout for the dialog
<?xml version="1.0" encoding="utf-8"?>
<LinearLayout
    xmlns:android="http://schemas.android.com/apk/res/android"
    android:layout_width="fill_parent"
    android:layout_height="fill_parent"
    android:orientation="vertical"
    android:padding="10sp">
    <EditText android:text=""
        android:id="@+id/categoryEditText"
        android:layout_height="wrap_content"
        android:layout_width="fill_parent"
        android:singleLine="true">
    </EditText>
</LinearLayout>
2. Override onCreateDialog in the Activity
@Override
protected Dialog onCreateDialog(int id) {
    switch (id) {
        case CATEGORY_DETAIL:
            LayoutInflater li = LayoutInflater.from(this);
            View categoryDetailView = li.inflate(R.layout.category_detail, null);

            AlertDialog.Builder categoryDetailBuilder = new AlertDialog.Builder(this);
            categoryDetailBuilder.setTitle("Edit Category");
            categoryDetailBuilder.setView(categoryDetailView);
            AlertDialog categoryDetail = categoryDetailBuilder.create();

            categoryDetail.setButton("OK", new OnClickListener(){

            @Override
            public void onClick(DialogInterface dialog, int which) {
                AlertDialog categoryDetail = (AlertDialog)dialog;
                EditText et = (EditText)categoryDetail.findViewById(R.id.categoryEditText);
                if (categories.get(selectedIndex)!=null){
                    //... some code
                }
            });

            categoryDetail.setButton2("Cancel", new DialogInterface.OnClickListener() {
            public void onClick(DialogInterface dialog, int which) {
                return;
            }});

            return categoryDetail;
        default:
            break;
    }
    return null;
}
3. Override onPrepareDialog to dynamically set default value before the dialog is open
@Override
protected void onPrepareDialog(int id, Dialog dialog) {
    switch (id) {
        case CATEGORY_DETAIL:
            AlertDialog categoryDetail = (AlertDialog)dialog;
            EditText et = (EditText)categoryDetail.findViewById(R.id.categoryEditText);
            et.setText(defaultValue);
            break;
        default:
            break;
    }
}
static final private int CATEGORY_DETAIL = 1;
//... some code
showDialog(CATEGORY_DETAIL);
Monday, February 1, 2010
Passing a list of objects between Activities
In Android, you can use Bundle to pass data between activities. There are many functions to pass Integer, String, etc. To pass an object, you will need to implement Parcelable interface and override some functions to serialize/de-serialize the object. Here is an example:
To pass an arraylist of Category to another activity,
To retrieve the data,
public class Category implements Parcelable {
private String category;
private ArrayList<Item> items;

public String getCategory() {
return category;
}

public void setCategory(String category) {
this.category = category;
}

public ArrayList<Item> getItems() {
return items;
}

public void setItems(ArrayList<Item> items) {
this.items = items;
}

public Category(){

}

public Category(String _category){
category = _category;
}

@Override
public int describeContents() {
return 0;
}

@Override
public void writeToParcel(Parcel dest, int flags) {
dest.writeString(category);
Bundle b = new Bundle();
b.putParcelableArrayList("items", items);
dest.writeBundle(b);

}

public static final Parcelable.Creator<Category> CREATOR =
new Parcelable.Creator<Category>() {
public Category createFromParcel(Parcel in) {
Category category = new Category();
category.category = in.readString();
Bundle b = in.readBundle(Item.class.getClassLoader());
category.items = b.getParcelableArrayList("items");

return category;
}

@Override
public Category[] newArray(int size) {
return new Category[size];
}
};
}
intent i = new Intent(_av.getContext(), ItemList.class);
Bundle b = new Bundle();
b.putParcelableArrayList("categories", categories);
b.putInt("index", _index);
i.putExtras(b);
startActivityForResult(i, ITEM_LIST);
Bundle b = this.getIntent().getExtras();

ArrayList<Category> cats = b.getParcelableArrayList("categories");
int index = b.getInt("index");
How to add MessageBox in Android?
Simple message box with no buttons
AlertDialog alertDialog;
alertDialog = new AlertDialog.Builder(this).create();
alertDialog.setTitle("Packing List");
alertDialog.setMessage("Could not find the file.");
alertDialog.show();
Message box with buttons
AlertDialog deleteAlert = new AlertDialog.Builder(this).create();
deleteAlert.setTitle("Delete List");
deleteAlert.setMessage("Are you sure you want to delete this list?");
deleteAlert.setButton("Yes", new OnClickListener(){

@Override
public void onClick(DialogInterface dialog, int which) {
//...
}
});
deleteAlert.setButton2("No", new OnClickListener(){

@Override
public void onClick(DialogInterface dialog, int which) {
//...
}
});
deleteAlert.show();
Thursday, January 14, 2010
How to deploy Android application?
1. Create icon for your application and add it to the project


2. Export unsigned application

2. Generate personal certificate by using keytool in java’s jre\bin directory
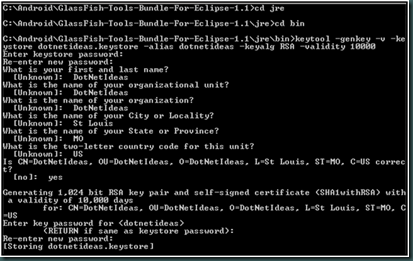
3. Sign Android application by using jarsigner in jre\bin direcotry

4. Installation


2. Export unsigned application
Right click on the project. Click on “Android Tools->Export Unsigned Application Package…”

2. Generate personal certificate by using keytool in java’s jre\bin directory

3. Sign Android application by using jarsigner in jre\bin direcotry

4. Installation
a) Install application on emulator

b) Install application on device
I downloaded ASTRO File Manager and copied the apk file to device. Use File Manager to find the file and tap on it. It prompted me a couple of questions. I have to change my device setting to allow unknown source apps to be installed on my device.
How to obtain Google Map Key for Android Application?
This link will give detailed information on how to get Google Map Key for Android Application. I don’t need to repeat it. Here I just want to give simplified steps for future reference:
1. Get MD5 Fingerprint of the Certificate
3. Add the key to your application’s AndroidManifest.xml
1. Get MD5 Fingerprint of the Certificate
a) SDK Debug Certificate

b) Your Signing Certificate
2. Go to this link to sign up for an Android Maps API key

3. Add the key to your application’s AndroidManifest.xml
<com.google.android.maps.MapView
android:layout_width="fill_parent"
android:layout_height="fill_parent"
android:apiKey="[your key]"
/>
MapActivity cannot be resolved to a type
When I first working on with MapActivity, I got above error. I kept press Ctrl+Shift+O. However, the type just wouldn’t resolve. Finally I found the answer on the Internet. You need to change the build target to “Google API”
Right click on the project. Go to “Properties”. Change the “Build Target” from “Android 1.x to Google APIs 1.x”

Right click on the project. Go to “Properties”. Change the “Build Target” from “Android 1.x to Google APIs 1.x”

Subscribe to:
Posts (Atom)